As you may have seen in a recent post, I had a bookish, sewing surprise turn up not so long ago! Janene of Ooobop! fame was particularly interested in, and very subtly suggested that I review one of these books – Claire Shaeffer’s revised and updated Couture Sewing Techniques. So here goes Janene! 🙂
I would like to preface this review with the sad fact that I in fact have not had a chance to read this cover to cover, but I will give you my thoughts so far.

Beautiful images and secrets
I am thoroughly enjoying this book, and I am particularly enjoying looking at the beautiful images of couture garments, many of which are actually from the authors own collection (jealous much?!), and others from a range of museums. Not only do you get to see the gorgeous exterior of these garments, but we as readers are treated to the behind the scenes ‘innards’ view – and it’s amazing!
Have you ever wondered how couture garments sit ‘just so’ on the wearer? There’s a ‘stay’ for everything, or perhaps weights were used in the hem, or maybe there’s a harness in there – you’ll never know (until you read this book of course!).

Look at all these secret closures - Marc Bohan for Dior
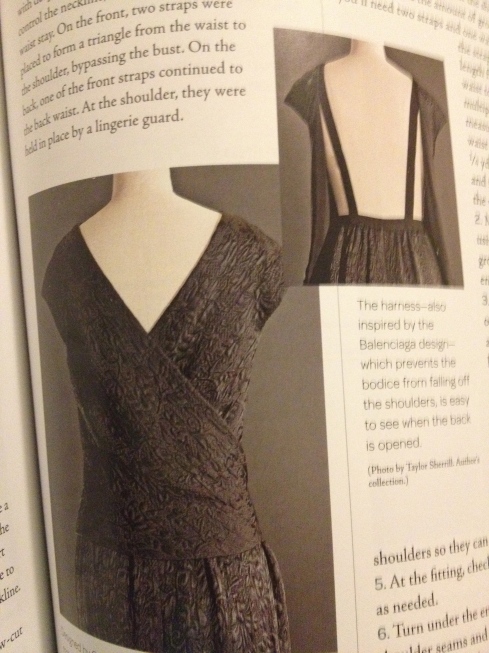
From the author's collection, without the harness shown on the right, this Oscar de la Renta dress would fall open and shift off the shoulders.
Behind the scenes
I also particularly enjoying travelling into my imaginary world where I can afford to purchase couture garments! Early on, Claire takes the reader into a Parisian house of couture and explains the process you would go through to order a couture design. Right from making an appointment with the directrice, through to the premiere taking your measurements, and finally the design being logged into the livre de compte, and being carefully packed and delivered to your hotel or shipped to your home.
What? A girl can dream 🙂
Haute couture versus ready-to-wear
Now I don’t know about you, but I’ve always wanted to know exactly what makes a garment ‘couture’ as opposed to high end ready-to-wear (RTW). Ms Shaeffer has answered my prayers with a lovely double page spread table comparing many, many features. There’s a taste of this marvellous table below.

Introduction to Haute Couture vs Ready-to-Wear
So what else is covered?
As I mentioned earlier, I haven’t gotten through this delight in its entirety – unfortunately! But for your information, the book is basically split into two sections, Part One: The Basics of Couture Sewing, and Part Two: Applying Couture Techniques. I’ve covered off a little bit of part one above. What I’ve shown above is almost the background information I guess, but the book does get much more practical, showing the reader how to execute these gorgeous techniques.
Here’s a taste of what else is covered in part one:
- hand stitching techniques
- seam finishing
- marking techniques
- darts
- pressing techniques
- shrinking and stretching
- edge finishes
- closures
And part two, applying couture techniques, covers things like:
- skirts and pants: waistbands, pleats, fitting, hems and cuffs
- blouses and dresses: fitting, blouse godets, invisible details
- sleeves: shaping sleeves, sleeve heads, boosters, interfacing
- pockets: patch pockets, set-in pockets, bound slash pocket
- jackets and coats: characteristics of a couture jacket, tailoring, fitting, shaping
- designing with fabric: seaming lace to lace, designing with stripes
- special occasions: special hem finishes, boning, embellishments
Hints and diagrams
And along with Claire’s descriptions and ‘how-tos’, we readers are treated to many diagrams and hints – yay! – a sample of which you can see below.

An example of the diagrams and hints throughout this book.
So, overall, I think this book’s a winner! And for only $25 (or thereabouts), you can’t really go wrong!
Have you read Couture Sewing Techniques? What did you think?
Apologies for the photography, but I don’t profess to be a photographer 😉
Oh and one other thing…
The Versatile Blogger award
The gorgeous Tina over at Down the Retro Rabbit Hole passed me ‘The Versatile Blogger’ award – oh em gee, thank you Tina!! Tina’s from Philadelphia in the United States, and describes herself as “Borderline crazy cat lady with an affinity for old things…” – I do like me a crazy cat lady! And Tina loves grammar – I love grammar too! I do get a bit loose in the blog world though (I’m sorry, perhaps it’s my pathetic form of rebellion) 🙂 Anyway…

So, what exactly does this Versatile Blogger Award entail?
It does come with a few rules:
- Add the badge to the winning blog page. tick
- Thank the blogger who gave it. tick
- List the rules. tick
- List seven (7) random facts about yourself. see below
- The ritualist passing on of the award to fifteen (15) deserving and conscientious bloggers who are nominated for their diligence, demonstrated skill, and achievements in the world of blogging and specifically in the sewing related category. wow-wee! 15 is a lot! I’m sorry to be a party pooper, but I’m going to go for five (ok, maybe six – seven) instead.
- Contact the nominated bloggers and let them know they are a recipient. I’ll do this soon – promise!
Hmm, so seven random facts about me hey…. what a boring topic, but I’ll do what I’m told. Here goes:
- I luuurrve animals. Not the insecty or scaly types though. I have a particular affinity for cute furry ones. (See picture of cute, furry animal below for an example.)
- I grew up about an hour out of Melbourne, in Geelong. It has therefore been bred into me that I support the Geelong Football Club.
- I am addicted to extra-curricular activities. In my life I have participated in the following: lots and lots of netball, basketball, sewing, salsa, art classes, drama classes, jazz ballet, gymnastics, flute lessons, piano, ballet and that’s all I can remember at the moment. If I had my way, I wouldn’t work, and I would do extra-curricular activities all day everyday! That reminds me, must investigate pattern making courses…
- I enjoy driving – particularly long distances, with the stereo pumping – but I do not like parking (or turning right onto busy roads).
- I am aiming to run an 8km fun run in May this year. We’ll see! (Note: I have completed the Oxfam Trailwalker 100km walk, so there is hope I can complete this run!)
- I love Italy, and nearly all things Italian. Including but not limited to, pasta, wine, Rome etc etc. I spent two weeks there in 2009 and LOVED it.
- I would really, really, really like an iPad 🙂

Ollie, the cute, furry animal. A friend's latest addition to the family - so cute!!
Soooooo, who shall I choose as the next round of winners… (I’ve tried to change these out from my recent Liebster Blog Award nominees, sharing the love and all – you know how it goes.)
- Seamstress: Poppykettle: The lovely Ms. Poppykettle pumps out the sewing delights, while also offering very clear tips and techniques. I just couldn’t resist throwing one of these her way, we sewed at the same school!
- Tilly and the Buttons: I’ve been following Tilly’s sewing exploits for a while, she creates the most gorgeous numbers.
- Jorth: Another Melbourne blogger who I’ve been lurking about for some time. Jorth has the cutest writing style, and gorgeous photography.
- Splatastic: Yet another Melbournite I’ve been lurking about. Natalie’s garments are so CUTE!
- Sew Tessuti: One more from Melbourne 🙂 I’m particularly fond of the pattern reviews on Sew Tessuti, and I also love seeing all the ways people create garments with their fabrics from Tessuti – especially when they’ve used a fabric I would never have considered and it looks amazing!
- Last one, Janene from Ooobop! I am barely two months into this blogging thing, and Janene was the first to comment on my blog *ooowwww!* She is also very clever at pumping out Dorothy Dresses in an evening, and makes lots of pretty quilting blocks.
- Special mention must go to JuliaBobbin too, I would have obviously thrown my classmate one of these awards, but Tina already covered her off! Yay Julia!
Woah.. what a long post. I will stop boring you now. 🙂
Z xx
Tags: Award, Book, claire shaeffer, Couture, marc bohan, oscar de la renta dress, Review, Sewing, Shaeffer, Techniques, Versatile blogger


