Archive | Tops RSS feed for this section

Mandy, you’re a fine girl

19 Apr

Many months ago, it was a toss up between Tessuti’s Mandy and Grainline’s Hemlock. I can’t remember why now, but for some (maybe rational) reason I went with Mandy. However, I think my fabric selection was a subliminal ode to Hemlock now I look at it!

ZoSews Mandy Tee

I LOVE this top, and I want to wear it ALL THE TIME!! I have to remember to circulate it 🙂

ZoSews Mandy Tee

As much as I LOVE THIS TOP, my sewing machine HATES KNIT FABRIC. Hence the ugly neck stitching.

ZoSews Mandy Tee

I constructed Mandy with my overlocker, but had to turn and stitch the neck. It’s icky. I’ve tried everything, wooly nylon, tension changes etc etc etc, my machine hates all the knits. 😦 In fact, it hates the knits so much that a pair of Anita pants I was working on yesterday are puckered all the way down the side seams and the machine struggled to sew five stitches without cracking the sh*ts. Put a woven in though, and the biatch was perfect – groan. I may blog these pants, but for now they’re pretty much relegated to wearing on long haul flights lol.

Because my machine hates all the knits so much I didn’t finish Mandy’s hem or sleeves, I reckon she looks fine though.

ZoSews Mandy Tee

The fabric is a cheap as chips poly blend (?) from Rathdowne Fabrics.

Those of you who are super smarty pants’ will notice that my hair is long in these pics, yep, they’re some months old Sherlock 🙂

ZoSews Mandy Tee

Conclusion: If you want a comfortable, easy to wear, easy to sew top – getchoself a Mandy. She’s a free pattern – how could one refuse?

Z xo

PS: Happy Easter to those who celebrate. We’re enjoying a four day weekend here in Aus. Yee hah.


Finished: Dove T, and a Christmas giveaway!

18 Dec

Christmas is so close dear readers, I can smell the turkey and taste the wine as I write.

How are your gift makes going? Some people, like Karen, were smart enough not to go down the path of gift makes, I unfortunately was not one of those smart people. So now I find myself scrambling to finish… Can’t share pictures yet for fear of ruining that lovely ‘surprise’ affect – but they’ll come.

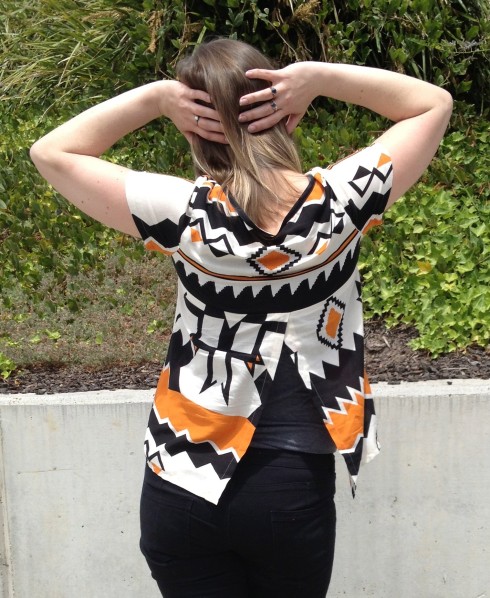
Anyhoo, on to my finished Dove T! I’m so happy with this top, I hope you guys like it too 🙂

You may recall the toile of this garment, I look at the finished top and in the words of Fatboy Slim, I think, you’ve come a long way baby!

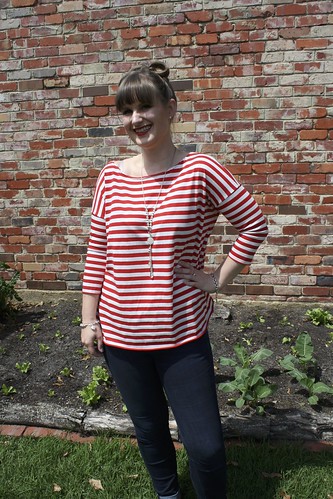
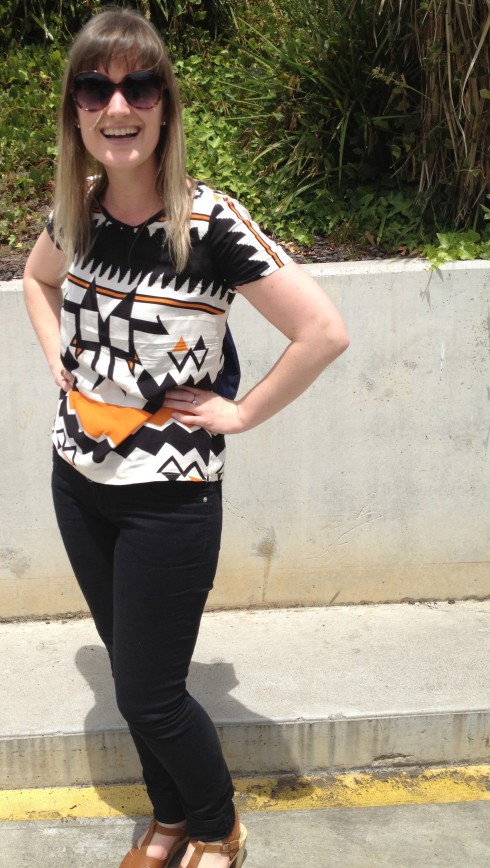
So with no further ado, here she is, my tribal rayon Dove T! (Omigosh I love Rayon!)

About my Dove T

She was made out of a Rayon from Spotlight. I love this fabric. Aussies – have you noticed that Spotlight has really picked up its game recently?

Dove T front

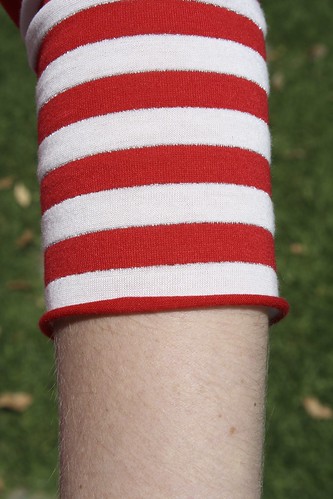
Can’t half tell from the pictures I’d been wearing it all day right?

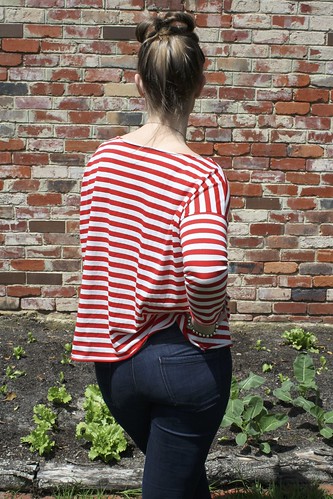
You may recall the fitting issues I was prattling on about with the toile. Everything was addressed by slashing the sleeve vertically down the centre and adding 1.5cm in width. It’s not perfect, but teamed with the liquid like rayon, it’s much more comfortable now.

Dove T back

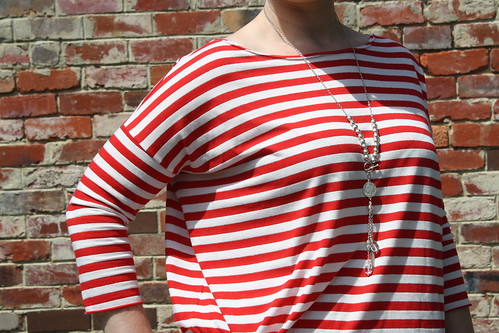
In the end I didn’t make any changes for ‘modesty’. For work, I just threw on a singlet underneath ( as above ) and for play, well it lets in a nice breeze on a hot day – and what’s wrong with that my friends?!

Dove T front 2

I reckon it almost took me more time to lay this out and cut than to actually sew it up. I was playing with only 1.5 metres worth and was being preeeety picky about pattern placement (surprise surprise). My stoopid hands are covering up where the patterns meet stunningly at the side seams in these pics though. 😉

Dpve T back 2

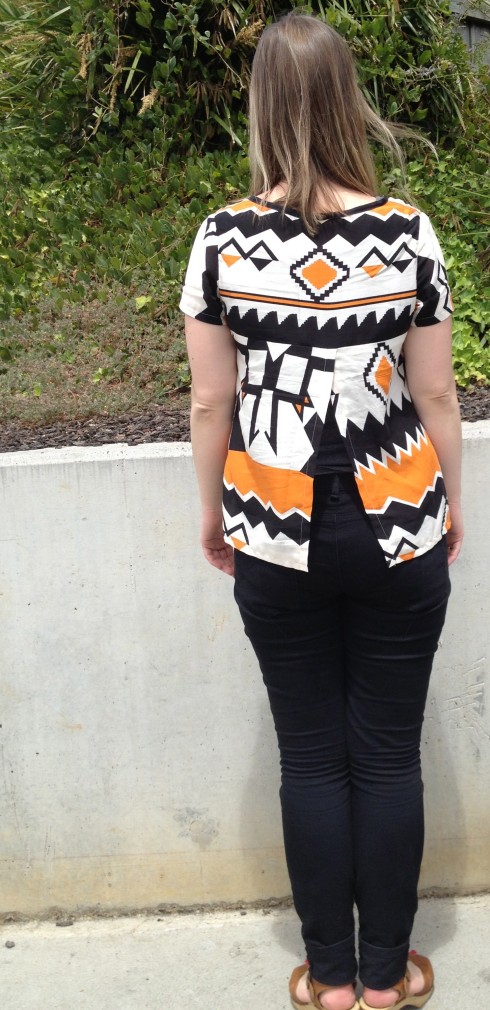
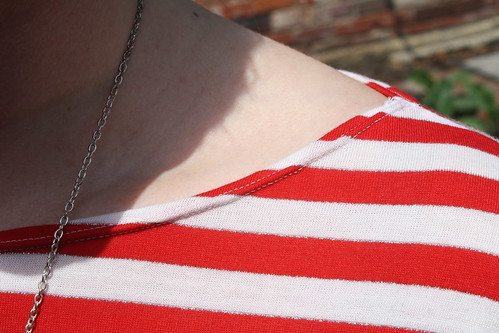
I added 8cm to the hem length, and you can see that I used bias binding rather than a facing around the neckline. Not much more to say really… except…

Do you want to get your hands on this pattern?!

I hear the crowds roar – “yes we do!”. Well I have good news for you. Thanks to the delightful Hannah of Sinbad and Sailor, one of you lucky people can get a free free free Dove T pattern of your very own! An extra bit of Christmas cheer me thinks.

“How do I enter?”  I hear you ask. It’s a logical question. Just leave a comment on this post by 11:59pm Australian Eastern Daylight Time on Christmas Day (25 December 2012), not forgetting that we live in the future here, and answer this question:

What inspires you to sew your own clothes rather than buy them? 

Please make sure you include an email address/some method of contact in your comment too – I need to know how to stalk get in touch if you’re the winner. Then, Hannah and I will choose our favourite answer – I can feel the power rush going straight to my head 😉 – and the winner will be announced on the blog in the days after Christmas. That said, it is the crazy crazy Christmas season, so if we’re a little bit late, please forgive us and know that it’s all happening behind the scenes. 

That’s it my lovely sewing friends.

My best wishes to you and yours over the holiday season and into 2013. Please stay safe, be jolly and enjoy it.

Z xx

WIP: Dove Fitted T

26 Nov

I am supposed to be blogging about a dress I finished and wore to my 30th birthday soiree (karoke anyone?!), but I couldn’t wait to see what y’all think about my next WIP, the Sinbad and Sailor Dove Fitted T, so you’re going to have to wait for the dress – sorry!

As I mentioned in my last post, Hannah from S&S contacted me and asked if I’d like to make this garment. I’ve now completed a trial garment in a funny little (cheap!) print cotton from Spotlight in a straight size 12 so you guys get the best idea of the pattern out of the box – before I Zoe-ise it!!

Here’s the front – sorry about the grainy pics… eeek. To me, the fit was perfect – until I added the sleeves. There’s now those drag lines from the bust… any ideas peeps? Also, once the sleeves were on there wasn’t a whole lotta room to move – you know when you’re trying to put your arms out in front of you… Again, tips welcome here! The ideas I’ve had to address this so far are to maybe add 1cm to the back, or look at the height, and back line of the sleeve piece. Who knows?! Tell me 🙂 PS – like my pretty necklace? T’was a b’day present from some lovely ladies 🙂

Sinbad and Sailor Dove Fitted T

And here’s the back. Looking pretty good I think. I am wondering about those funky lines at the back of the sleeve – do they mean something?

Dove fitted T back

The instructions were really clear, with lots of details, for example, …don’t backstitch…, and this would be a great garment for anyone who doesn’t have an overlocker because cleverly all many of the raw edges are neatly tucked in under another fold.

The open back means you can just pull it on and off over your head without adding any kind of closure. Oh, and I really like the neckline.

Changes I’m going to make for the ‘real’ one

In addition to any fitting changes;

  • The back opening: I want to be able to wear this to work, and would feel a little bare with skin showing at the back. So, I’m thinking, I’ll either a.) make the pieces wider and cross over more, or b.) add a pretty little tie at the bottom that can tie the pieces together.  Or maybe even both. Or I could just wear a singlet underneath lol. Or do you have another idea you’d like to share?
  • Neck facings: I found the trickiest part of this garment the front neck facing, there was some serious easing required. So, the next one, I’m going to use bias binding around the neck. Whilst this eliminates the facing, the reason for this change was design related rather than issues with construction (yet a nice coincidence 🙂 ).
  • Length: As per usual, I will lengthen, probably by about 4cm.

I’m going to use a ridiculously cool printed rayon that’s going to have much more drape than this little number – can you tell I’m excited? 😉

Love to hear your tips and thoughts! And fess up, what’s on your sewing table that’s exciting you at the moment?

Z xx


Finished: Wiksten Tova

30 Oct

Yee Hah! Thanks to your voting, I finished my Tova a coupla weeks ago now. It was an easy make, and I heartily recommend it – especially to you tunic lovers out there! I made it in Liberty of London Tana Lawn – Mitsi Green from Tessuti.

The only slightly tedious parts to sew were the corners of the inset.

Here she is, with a slightly tired looking owner!

Image

Of course I added length as well. Probably around 8cm. I’ve worn it as a dress, and as top – versatile right?!

Now, get ready for the arty (out of focus) shot.

Here’s a close up of the collar and placket too.

I want to make this bad girl again. But sleeveless, and without the collar. Maybe with some pretty buttons down the placket too 🙂 Do you reckon it would work?

PS – to those of you in the US affected by Sandy – stay safe and well. We’re thinking of you here in Aus. xx

Finished: Undercover Hood

1 Sep

I actually finished my Papercut Patterns Undercover Hood last weekend but was waiting to get some photos – which I now have – yay! 🙂

So let me introduce my favourite new toy – a pink and grey hoodie. Check out those matching stripes, oh yes yes yes.

Papercut Patterns Undercover Hood ZoSews

Fabric is a Marc Jacobs cotton jersey like thing from The Fabric Store, and it was a bit of a shite to sew with to be honest. Stripes were mismatched and completely off grain – which made for some fun stripe matching smackdowns (otherwise known as easing and forcing and manipulating).

I didn’t self line the hood. Instead I used some pretty pinky cotton from Spotlight. I also bound the hood/neckline seam with the same pretty pinky cotton.

Undercover Hood lining and binding

Apart from the stripe matching smackdowns and moments of confusion over the cuffs (see cuff tutorial) this was actually a pretty easy make.

ZoSews Papercut Patterns

I cut it to the right size and then made it with 1.5cm seam allowances rather than the 1cm allowances as per pattern instructions. Funnily enough, I think I would have been better off sticking with the 1cm allowances (duh!), teamed with the thicker than recommended fabric it’s little bit snug I think. I also took about 4-5cm off the sleeve length.

ZoSews Undercover HoodI would heartily recommend this pattern. I would like to try it out in a merino too I think… Oh yeah, and the packaging is devine!

Finish off with a zig and a zag

9 Aug

I recently acquired a top from Country Road – one of my favourite places to acquire new things actually. 🙂

It’s from their Spring release, and I think it’s versatile enough to be on trend for this season, without screaming, “that’s so last season” in the future – well I hope so anyway. Here’s a pic from their site; the pink panel is covered with sequins. The sequins actually remind me of fish scales… which is a bit gross.

Sequin Front Top - Country Road

For illustrative purposes only – linked to source.

Anyway, I’m posting about this because of the edge finish. I thought it was pretty from the moment I saw it. But on its first wear today I took the time to actually look properly at how the edges had been finished. They’re raw, and just finished off with a neat zig zag. Cool hey? I think it gives a great effect, but I can see how it may not look so great if it wasn’t neatly sewn.

Sequined top zig zag edging

Here’s another look at it.

Zig zag edging

I’m not sure how sturdy this kind of finish is, but given that it’s a silk top covered in sequins it’s going to be treated delicately anyway.

I don’t recall ever seeing this before. Me likey. Not only is it pretty, but a time saver. Win win! What do you guys think?

Happy homemade shirred tunic

29 Jul

I was absolutely delighted last Christmas to receive a Japanese pattern book from my lovely friend Lulu. What added to it is that Lulu’s not even a sewer, but she was all over the Japanese pattern books – loved it!

The particular book that I was kindly gifted was happy homemade vol. 1 treasured collection, by Yoshiko Tsukiori – in English, oh yes! (My Japanese is certainly not what it used to be, and given that it was never much chop to start with… you see where I’m going here.)

Happy Homemade vol. 1 treasured collection

The first pattern I made, and unfortunately the only one I’ve made so far, is G – Shirred dress – using a Japanese cotton from Spotlight teamed with a cute cotton trim from Tessuti.

G - shirred dress

This is me, wearing my ‘dress’ (that I’ve actually decided is a tunic – way too short for me as a dress!). I did think about adding extra length to make it more of a dress length, but I like wearing tunic length tops so left it as it was.

ZoSews shirred dress

Don’t mind the creases!

shirred dress side

Here’s a close up of the trim and shirring. It was the first time I’d shirred anything, it wasn’t hard – I’d recommend you give it a go, if you haven’t already of course! The pattern called for four rows of shirring, but I added an extra one (total of five rows) at the top to stop any gaping/flapping at the neckline.

close up of shirring and trim
I was lazy and didn’t baste the trim first which made it a bit of a &^%$ to sew on, but by the time I’d hit the trouble spots (namely, the corners) I’d gone too far and was way past stopping so I ploughed on- you know how it is. That, and the fact the print on the fabric hides a multitude of sins – like ugly stitching 🙂

sleeve with tessuti trim

One other ‘moment’ I had – I stupidly cut out the sleeves together without ‘good sides together’ so I ended up with two sleeves shaped the same. Luckily there was only a slight difference between the front and back of the sleeve in this pattern, so I just altered the seam allowance a little on one to make it work.

A couple of other notes:

  • I redrafted the facings to make them wider, and separate pieces, rather than one long, thin piece of about 1.5 cm width. One, because it was easier to sew that way, and two, because the wider facings would sit better while being worn.
  • These patterns keep you on your toes – there’s many different seam allowances used and I decided to follow the instructions on this. You need to make sure you’re all the ball and using the correct allowance size on the correct seam.

So that’s my first foray in to the world of Japanese patterns – and I like it! Have you sewn any garments out of any of the Japanese pattern books? What did you think?

Z xx

PS – Are you watching the Olympics? I’m hooked 🙂


Winner winner chicken dinner!

20 May

At the start of the month I was lucky enough to be a winner of a lucky dip over at Kestrel Finds and Makes. And this week, my winner’s package arrived – all the way from Glasgow! Thanks Kestrel!

There was Simplicity 7780 with a range of shirts, from 1968, and Butterick 4225 with a lovely dress and jacket (can’t see a date on this one, but to my untrained eye it looks maybe 1970s). How exciting!

The dress in particular struck me, and made me think of the black and white bird fabric I’d seen over at Bimble and Pimble… may just have to get my butt down to Spotlight to pick some up – I think it would work! The neckline of this dress also reminds me of the new Colette patterns, Hazel and Lily.

Lucky dip patterns - kestrel finds and makes - simplicity 7780 butterick 4225

You may have read also that I was the winner of a brooch from JuliaBobbin / RueMiraldi. With all these prizes coming my way, I think I should be buying a lottery ticket! But anyway, here’s a picture of the brooch – isn’t it lovely!

Vintage brooch - Julia Bobbin

And finally, I spent the afternoon at Love Vintage yesterday with two lovely ladies from my sewing class. Where I picked up these patterns…

Love Vintage Melbourne patterns - simplicity 7239 style 1980 home journal pattern 11541

The blouse on the right is my favourite 🙂 It seems I did have a blonde moment when purchasing these unfortunately (nothing against blondes – I was one for many many years)… See the middle pattern, yep, the one with the lovely pussy bow blouse? Yep. Right. Well it’s actually a pattern for the skirts not the blouse. Doh! Not that I hate the skirts or anything, but I really did only buy it for the blouse! Dammit! I only realised when I got home…

I also got these magnificent Alexis Kirk earrings that I am completely in love with. Now I just need to find somewhere to wear them…

Alexis Kirk earrings

And I’m still chugging along with my Beignet… not long to go now, here’s a sneak peak…

Beignet sneak peakHow was your weekend? Did you get much sewing done?

Zxx

Renfrew you, Renfrew me

28 Apr

A couple of months back now, I took advantage of Tasia’s birthday discount and ordered myself a Renfrew, Lonsdale and Minoru. I already had the Pendrell and the Crescent skirt. And just quietly, I can’t wait to get my hands on the new Cambie too!

I tackled my first Renfrew in view C, the cowl neck. I had seen so many lovely versions online, and I wanted to join in the fun! I particularly liked Leith’s lovely yellow number. The plan was that this go was going to be my toile, with the hope that it would be a wearable one 🙂

So, over Easter, I Renfrewed it up. And this is what I ended up with. (Ignore how awkwardly it’s sitting above the bust, no mirror in the park to check prior to photos 🙂 )

Renfrew front view

What size to make?

It took me quite a bit of thinking and consideration to decide what size to make. The Renfrews I had seen online looked like there was quite a lot of ease in the pattern, and I was after something a little more fitted. So considering my measurements, the finished measurements and the fit I was after, I ended up making; the cuffs at a 10 (will go 8 next time), the front and back at an 8 grading to a 10 at the hip (will shape this in more next time, likely staying at 8 the whole way down), the cowl at an 8, sleeves at a 10 (will grade to an 8 below the elbow next time), and the waistband at a 10 (will go 8 next time).

Renfrew back view

The back - a bit baggy

More details:

  • I constructed the whole thing on my overlocker (serger). This was so quick and easy – loved it!
  • It’s made out of a stretch wool blend (??) from Darn Cheap Fabrics

If you are making view C, please, please note there is an error in the instructions. In the words of Sewaholic, “In Sewing Step 6, for View C, text should read ‘Sew collar pieces right sides together along un-notched edge’.”

Of course, I did not find this out until I started Googling after my tantrum of not being able to make it work. Joy.

At first, I had just gone ahead and sewn it correctly without reading the instructions (win!), but then, I stupidly read the instructions and tried to unpick the overlocking. This was a nightmare!! So I did something naughty and just cut it off. Gasp!

I then overlocked it together again as per incorrect instructions. Attempting the next step (step 7) would subsequently not work because it was now obviously constructed incorrectly.

Then I realised i had sewn it right the first time, and had to pull it apart and put it back together again. Cue tantrum. And I must confess, I did just cut the row of overlocking off again.

Renfrew cowl

The finished cowl

But it was all ok in the end.

I was a bit hesitant with the whole knit thing (I have a ‘knit scar’), but given that there were lovely cuffs and a waistband rather than those awful to sew double stitched hems – and I decided to overlock the whole thing – it was really quite easy (apart from the aforementioned tantrum).

And the best bit is, that even though I will change it for next time, this is totally wearable!

Here’s some more pictures:

Renfrew cuff

The cuff


Renfrew serging

The delightful overlocking and waistband

Oh and I am so so close to the finish line with my v8146, half a hand stitched hem and some prick stitching to go!!